¶ How to install GParted
GParted can be installed with
sudo pacman -S gparted¶ How to use GParted
Open GParted and remember that in a booted system not all partitioning can be edited, Due to being in use by the system.
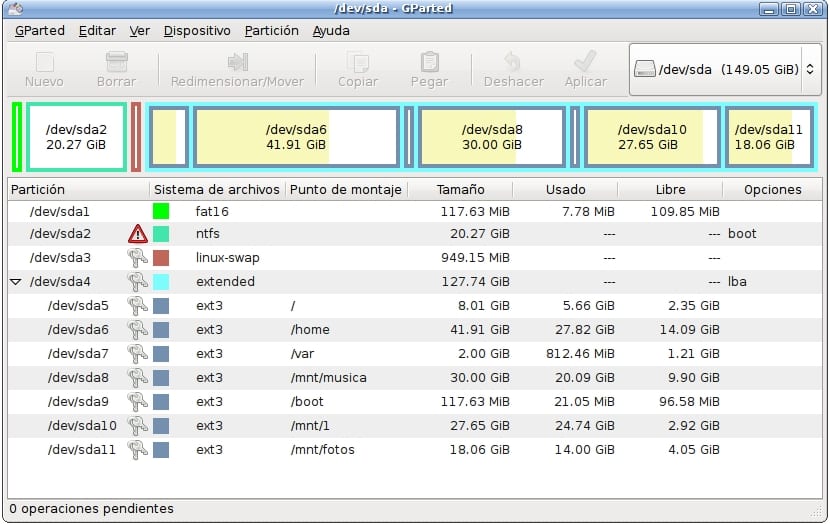
Having said that, we begin with the actual operation of GParted. In the interface we see the menu at the top, toolbar with quick buttons and a partition or storage device selector, just below there will be a bar divided or not in colored boxes that are the partitions in the chosen storage unit and on the back we will see a breakdown with some details of said partitions or unformatted spaces ... You will also be able to see the pending operations that GParted will perform right at the bottom edge of the window and that will be applied just when you click the "Apply" button once you have it clear.

Well, to act with GParted is very simple:
- Select the unit in the selector where you want to work (hard drive, USB stick, memory card, etc). It should appear in the drop-down selector menu, if it is connected to the computer.
- Now the partitions will be displayed, if any, from that storage unit. If there are no partitions, the space still empty will be shown for formatting and use. Whether it is a partition or empty space, if you select it with the mouse you will see that some buttons that were inactive on the toolbar become accessible to work with the selected space.
- You can also use the right mouse button on the slice or space on which you want to work and a menu with options will be displayed. You can see that details of each partition are shown, if it has a key icon it is that it is locked or in use and you cannot work with it. You will also see an arrow that when you click on it, it will show subdivisions of a partition if there are any, as well as the anchor point, file system used, size, etc.
- Now we may have selected a partition or a raw space. In any case the options that we are allowed are:
- New: It is used to create a new partition in unallocated or raw space. It is for when you have bought a new storage unit and it comes unformatted, to be able to give you one and that the system recognizes it to be able to work with it. You can create a single partition on a storage unit or several, depending on your needs.
- Remove: removes a created partition, ideal for when you want to free up that portion of the disk to join this raw space to another existing partition for expansion or simply to reformat it.
- Copy / Paste a partition: as its name suggests it allows you to copy and paste a partition in a given location. This will make the pasted partition have the same UUID, format and label as the copied one, which could generate a conflict, therefore, if you are not an expert, be careful.
- Resize / move: It is used to move partitions from one place on the hard disk to another (interesting in case of damage to a sector of the hard disk or memory to move the partition to another good sector) or resize them. For example, if we want to expand or reduce the size of a partition because it has become too small or simply to free up some space by reducing it and then adding it to another.
- Format like: format the storage unit or partition to give it a filesystem or FS from among those supported by GParted. GParted supports file systems or formats such as ext2, ext3, ext4, SWAP, FAT16, FAT32, etc. If the partition in question is going to be used as a swap space, you can choose SWAP. If it is destined for other uses on GNU / Linux systems, I recommend ext in its most modern version, ext4. But if what you need is a drive compatible with other operating systems to be shared, or even to be read / written by other devices such as a TV, printers, etc., then you must use FAT32.
- Disassemble / Assemble: unmount or mount the
/dev/xxxdevice from its mount point to be able to work with it if it doesn't let you or simply to unmount it if necessary. In addition, once done, it refreshes the distribution to show the updated content on the screen. - Check: it checks the partition, it will find and try to repair problems that it finds in a partition if it is damaged or corrupted.
- UUID: Allows you to change the Universal Unique Identifier of the device in question. This is best left untouched if we don't have a lot of experience.
- Label: names or labels the volume.
- Information: displays detailed partition or volume information.
- Once we have selected the work we want to do, it will be enough to give the icon that is like a green tick or V In the toolbox and GParted you will be able to work to do what you need ... Wait for it to finish and be careful that the computer does not turn off or the battery runs out in the middle of a process or the partitions may be damaged and lose data. So if you use a laptop, always have it connected to the network during the process.